UI Layer
In Flutter, the UI serves two main purposes:- displaying the application data on the screen.
- acting as the primary point of user interaction.
Essentially, the UI in Flutter is a visual representation of the current application state as provided by the data layer.
Typically, the data you receive from your data layer might not directly match the format required for display.
For example, you might need to extract specific pieces of data or combine information from multiple sources to present it effectively to the user.
The role of the UI layer is to handle these transformations: it converts raw application data into a format that can be rendered and displayed.
Thus, the UI acts as a conduit that ensures data is properly presented according to the needs of the user interface.
UI Layer Architecture
In Flutter, the term UI encompasses the various UI components, such as widgets, that are responsible for displaying data, regardless of the specific mechanisms used.The UI layer must effectively manage and present application data. To achieve this, the UI layer typically performs the following tasks:
- Transform Application Data: Convert app data into a format that the UI can easily render.
- Render UI Elements: Turn the transformed data into visual components that present information to the user.
- Handle User Input: Process user interactions with the UI components and update the UI data as necessary.
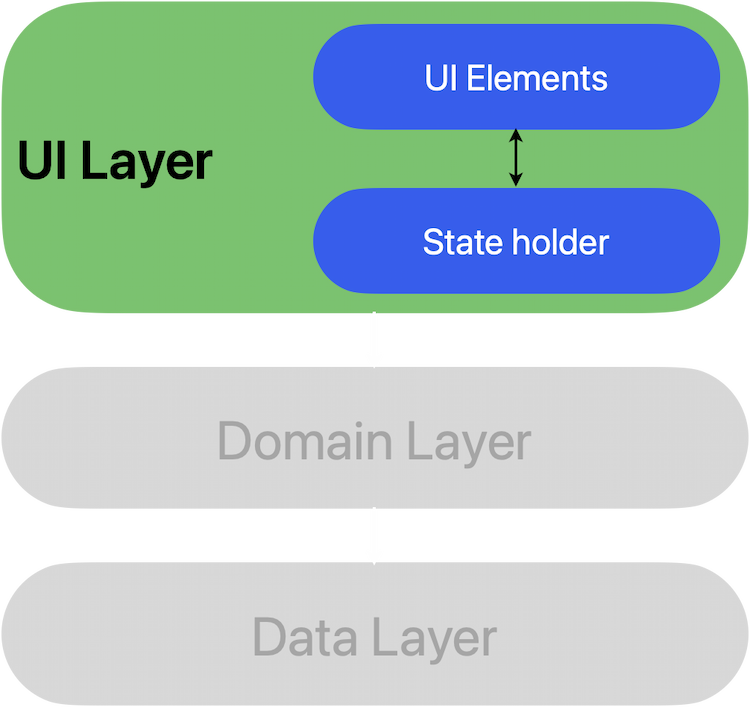
The UI layer is further divided into two sub-layers:
- UI Elements: These are the widgets that render the data on the screen, such as Text, Image, Input, or any other StatelessWidget or StatefulWidget.
- State Holders (ViewModels): These include tools like BLoC, Provider, or similar architectures that hold the data, expose it to the UI elements, and handle UI events. They serve as the bridge between the data and the UI, ensuring that any changes in the application data are reflected in the UI elements.
- Defining the UI State: Understanding and structuring the state that drives the UI.
- Unidirectional Data Flow (UDF): Using UDF to produce and manage UI state efficiently.
- Implementing UI: Developing UI that interacts with and consumes observable state.

Defining the UI State
Understanding and Structuring the State that Drives the UIIn Flutter, defining a clear UI state is crucial for managing and rendering the interface.When using Live Data, you can represent your state, which holds all the necessary data for the UI. Here’s how to structure it:
- Create a Product Model: Define a model class that represents the UI state, such as a product with properties like name, price, and description.
- Use MutableLiveData: Wrap this model in MutableLiveData from flutterx_live_data package, allowing it to act as an observable data holder. Whenever this data changes, the UI will be notified and can react accordingly
Freezed package come to make defining a model more easy:And let's define our Observable Data Holder:Product MutableLiveData will allow you to display your data interactively using UI elements, We will discuss this in Implementing UI.
import 'package:freezed_annotation/freezed_annotation.dart';
part 'product.freezed.dart';
part 'product.g.dart';

@freezed
class Product with _$Product {
  const factory Product({
    required String name,
    required String description,
    required num price,
  }) = _Product;
}import 'package:flutterx_live_data/flutterx_live_data.dart';
import 'package:xflutter_cli_app/models/data/product/product.dart';
// Initial Product State
const _initialProductValue = Product(
name: 'Apple',
description: 'Fresh and crisp apples, perfect for snacking or incorporating into various recipes.',
price: 50.0,
);
class ProductViewModel {
// Product observable data holder
final product = MutableLiveData<Product>(value: _initialProductValue);
}Immutability
In the example above, the UI state is defined as immutable. The main advantage of immutability is that it ensures the application’s state remains consistent at any given moment. This allows the UI to focus on one responsibility: reading the state and updating its elements based on that information. Therefore, you should avoid directly modifying the UI state unless the UI is the only source of its data. Breaking this rule can introduce multiple sources of truth for the same data, leading to inconsistencies and potential bugs.class ProductViewModel {
final product = MutableLiveData<Product>(value: _initialProductValue);
void updateProductName(String productName) {
// get latest value of product
final Product data = product.value;
// update data holder with new data
// using copyWith will create new instance from product
product.postValue(data.copyWith(name: productName));
}
}Unidirectional Data Flow (UDF)
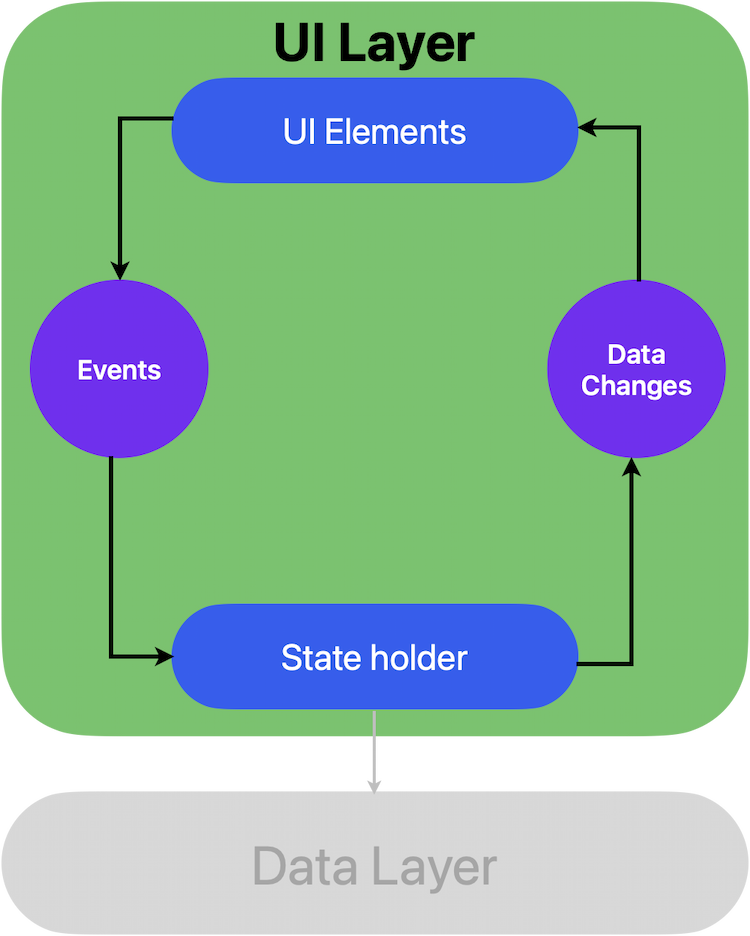
Interactions in the UI can benefit from a mediator that handles the logic for each event, processing them and transforming the underlying data to generate the UI state.While this logic can reside within the UI itself, this approach can quickly become overwhelming.
The UI ends up taking on multiple roles—data ownership, transformation, and production—leading to tightly coupled, complex code that’s difficult to maintain and test.
To keep things manageable, it’s better to reduce the UI’s responsibilities. Unless the UI state is very simple, the UI should focus solely on consuming and displaying the state, leaving the rest to a dedicated mediator.Unidirectional Data Flow models the process of state production by clearly separating where state changes are initiated, where they are transformed, and where they are finally consumed.
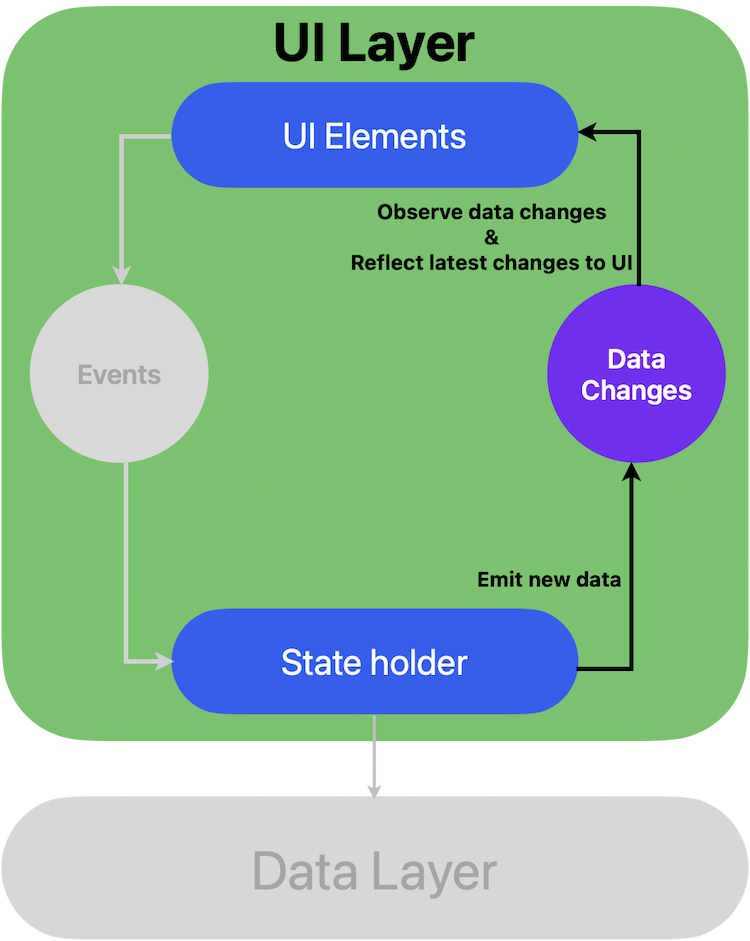
This structure allows the UI to focus solely on its intended role: displaying information by observing state changes and communicating user actions back to the ViewModel by events.
UDF offers several advantages:
- Data Consistency: It ensures a single source of truth for the UI, preventing conflicting data states.
- Testability: By isolating the source of state, UDF makes it easier to test the state management independently of the UI.
- Maintainability: State changes follow a clear pattern, with mutations driven by user actions and external data sources, making the codebase easier to manage.
Update Data with UDF from UI elements side:
// ❌ without using UDF
@override
Widget build(BuildContext context) {
  return Scaffold(
    body: SafeArea(
      child: InkWell(
        child: Text('Update Product Name'),
        onTap: () {
          // update product name directly from UI element
          final Product data = viewModel.product.value;
          viewModel.product.postValue(data.copyWith(name: 'new name ${DateTime.now()}'));
        },
      ),
    ),
  );
}
// ✅ using UDF
@override
Widget build(BuildContext context) {
return Scaffold(
body: SafeArea(
child: InkWell(
child: Text("Update Product Name"),
onTap: () {
// send event to state-holder for update
viewModel.updateProductName('new name ${DateTime.now()}');
},
),
),
);
}
Update Data with UDF from State holder side:
class ProductViewModel {
  // ❌ without using UDF
  final product = MutableLiveData<Product>(value: _initialProductValue);
}
class ProductViewModel {
// ✅ using UDF
/// prevent update values outside viewModel
/// [LiveData] is an observable data carrier with no update capability value,
/// only [MutableLiveData] can be updated.
final _product = MutableLiveData<Product>(value: _initialProductValue);
LiveData<Product> get product => _product;
/// handle update [Product] name event
void updateProductName(String productName) {
final Product data = _product.value;
_product.postValue(data.copyWith(name: productName));
}
}
Implementing UI
Once your UI state is defined and observable, the final step is to build UI elements that can consume this state. By observing MutableLiveData,you can make your widgets react to data changes seamlessly.flutterx_live_data provides an easy way to listen for observable data changes by:
- LiveData Builder: update some UI element based on new data.
- Register Observer: listen for data changes outside of your UI element tree.
1- Using LiveDataBuilder:
Update UI elements with latest changesimport 'package:flutter/material.dart';
import 'package:flutterx_live_data/flutterx_live_data.dart';
import 'package:xflutter_cli_app/models/data/product/product.dart';
class ProductScreen extends StatefulWidget {
const ProductScreen({super.key});
@override
State<ProductScreen> createState() => _ProductScreenState();
}
class _ProductScreenState extends State<ProductScreen> {
final viewModel = ProductViewModel();
@override
Widget build(BuildContext context) {
return Scaffold(
body: SafeArea(
child: Column(
children: [
const Text('Product Screen'),
LiveDataBuilder<Product>(
data: viewModel.product,
builder: (BuildContext context, Product product) {
// re-built every time viewModel.product value changed
return Column(
children: [
Text(product.name),
Text('${product.price} USD'),
Text(product.description),
],
);
},
),
],
),
),
);
}
}2- Using Register Observers:
Listen for changes outside the UI treeimport 'package:flutter/material.dart';
import 'package:flutterx_live_data/flutterx_live_data.dart';
import 'package:xflutter_cli_app/models/data/product/product.dart';
class ProductScreen extends StatefulWidget {
const ProductScreen({super.key});
@override
State<ProductScreen> createState() => _ProductScreenState();
}
class _ProductScreenState extends State<ProductScreen> with ObserverMixin {
final viewModel = ProductViewModel();
@override
void initState() {
doRegister(); // start observing changes
super.initState();
}
@override
FutureOr<void> registerObservers() {
// listen for product changes
viewModel.product.observe(this, (Product value) {
// show snackBar for each product update
ScaffoldMessenger.of(context)
..hideCurrentSnackBar()
..showSnackBar(
SnackBar(content: Text('Product ${value.name} updated!!')),
);
});
}
@override
void dispose() {
doUnregister(); // stop observing changes
super.dispose();
}
@override
Widget build(BuildContext context) {
return Scaffold(
body: SafeArea(
child: Column(
children: [
// ...
],
),
),
);
}
}