State Management
State management is one of the most critical aspects of developing applications in Flutter. In essence, state refers to the information required by an app to represent its UI at any given moment. For example, in a login screen, the state might include whether the user is authenticated, the email and password they input, and any validation errors.Managing this state properly is essential for making sure that the UI remains consistent with the data, responds correctly to user input, and handles events such as network responses or system updates.Flutter offers a variety of solutions for managing state. For simple cases, the setState() function can update the UI directly. However, as apps grow more complex,
this basic approach becomes hard to maintain, leading developers to use patterns like Provider, Riverpod, or BLoC (Business Logic Component).
Each state management solution helps organize the logic that drives the UI and ensures that the app reacts efficiently to changes. The primary goal is to make it easy to maintain data consistency while decoupling business logic from UI code, which can become quite entangled otherwise.Now that we’ve covered the general concept of Flutter state management,
let’s dive into a specific state management approach using ViewModel combined LifecycleOwner and LiveData as the observable data holder. This approach offers a structured, scalable, and efficient way of managing state in Flutter apps.
Using ViewModel for State Management in Flutter
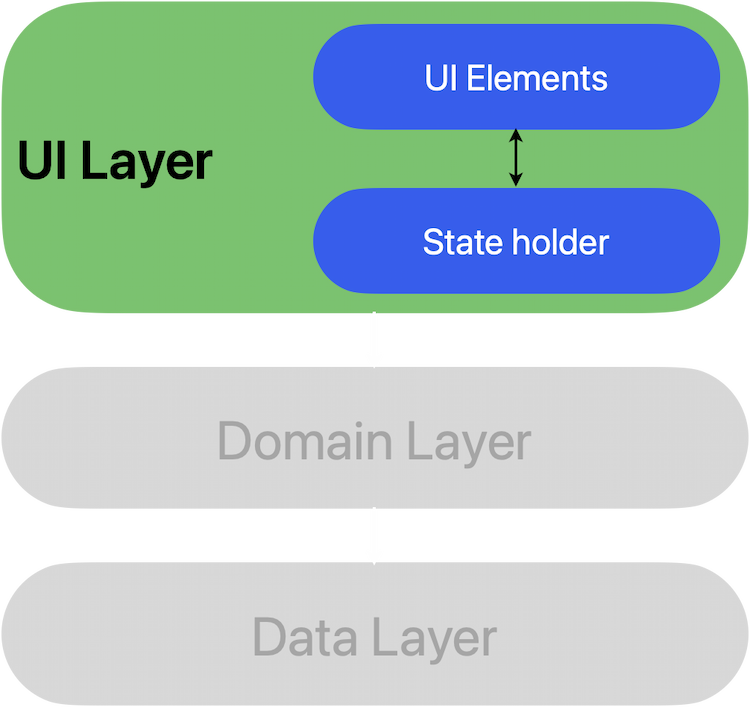
One efficient way to organize and manage state in Flutter applications is to implement a State Holder (ViewModel).This is a centralized class responsible for managing business logic and providing observable data for the UI to render. Here, we’ll walk through how ViewModel, LifecycleOwner, and LiveData work together to create a clean, maintainable architecture for managing state.
1. Separation of Concerns:
The core advantage of using a State Holder (ViewModel) is that it separates the business logic from the UI.In traditional Flutter apps, it’s easy for UI code to become bloated with logic that should be handled elsewhere. This makes the UI harder to read, maintain, and test.
The ViewModel eliminates this problem by acting as a bridge between the app’s data layer and its UI layer.The ViewModel handles tasks such as interacting with APIs, processing user input, and performing data transformations.
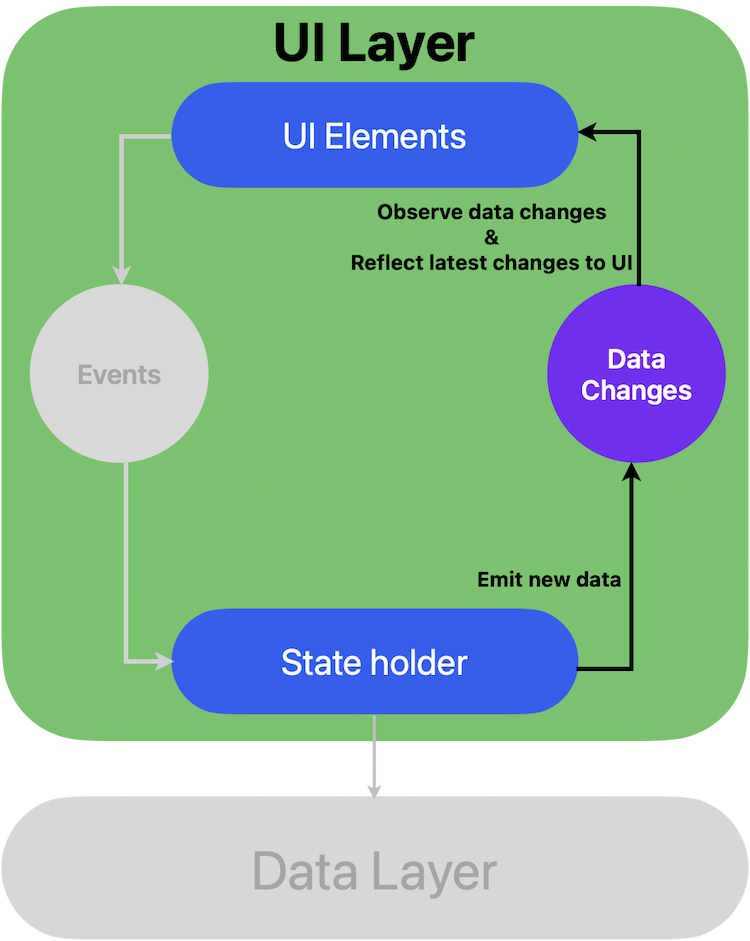
The UI’s role is reduced to rendering the ViewModel’s output and triggering events that prompt the ViewModel to act.
This leads to a cleaner architecture where business logic and UI logic are neatly separated.
For instance, in a login form, the ViewModel can manage validation, handle authentication, and expose a loading state, while the UI just observes those states and displays them.

2. State Management with Dependency Injection:
Dependency Injection (DI) is a design pattern that promotes loose coupling between application components by providing dependencies from an external source rather than creating them internally.When combined with state management, DI simplifies the management of dependencies like repositories, services, and APIs in your application, making the architecture more maintainable and testable.By leveraging DI frameworks, such as injectable, developers can ensure that state management components like ViewModels are efficiently managed and reused where necessary.
Key Advantages:
- Centralized Configuration: DI allows you to define and configure dependencies in one place, often in a module or provider class, ensuring consistency across the application.
- Reusable Components: Dependencies are shared across the app, enabling multiple ViewModels or widgets to use the same instances when needed.
- Improved Testability: DI makes it easy to mock dependencies for unit tests, allowing you to test state management independently of other components.
- Efficient Resource Management: DI can manage the lifecycle of dependencies, ensuring that resources like repositories or network services are cleaned up when no longer needed.
3. Lifecycle Management:
Managing the lifecycle of a ViewModel is essential for resource efficiency and smooth performance.In this architecture, LifecycleOwner ensures that the ViewModel is only created when needed and is destroyed when no longer required, linking its lifecycle to that of the screen.
This avoids memory leaks and ensures that resources are cleaned up once the screen is disposed of.Furthermore, LifecycleOwner works with Dependency Injection, enabling various components within the same screen to share a single instance of the ViewModel.
This makes it easier for separated UI components to access the same data source without the need to passing or reinitialize a new instance of the ViewModel each time.
For example, in a login screen where you might have several sub-widgets for handling different elements like inputs, buttons, and loaders, all these components can access the same ViewModel instance seamlessly.With Dependency Injection, you ensure that the ViewModel remains consistent across the screen, avoiding redundancy and ensuring that all UI elements observe the same source of truth.
This results in a cleaner, more maintainable architecture, where the ViewModel handles logic centrally while different UI components subscribe to it independently.In the login screen example, both the form inputs and the loading-progressBar can interact with the same instance of the LoginViewModel, making it easier to manage state changes and UI updates in a synchronized manner.
4. Enhanced Isolation with the “Params” Layer:
To further isolate the business logic and state from the UI, a “Params” layer can be introduced within the ViewModel. This layer acts as a dedicated structure for holding key variables, including observable data holders and business logic, ensuring that the ViewModel itself is kept lean and focused on coordinating the flow of data between the UI and the data sources.The “Params” layer provides additional separation of concerns, making it easier to test and maintain individual pieces of functionality. It allows you to store and manage variables such as MutableLiveData, state flags, and other business logic separately.This isolation benefits code organization and clarity, as developers can quickly locate and update specific pieces of logic without affecting the ViewModel structure.In the context of a login screen, for instance, the Params layer could house variables like the user’s email and password form, and the login result.
The ViewModel would then interact with these parameters, exposing the necessary data to the UI via observable patterns like LiveData.
5. Reactive Data Handling:
LiveData acts as an observable data holder in this architecture. This package allows the ViewModel to expose data as streams that the UI can observe and react to.As the ViewModel processes data or handles events (e.g., user input or API responses), it updates the MutableLiveData objects it holds. The UI listens to these changes and updates automatically when the data changes, creating a smooth, reactive experience for the user.For example, in a login screen, the ViewModel might hold a MutableLiveData<bool> to indicate whether the login process is ongoing (true for loading, false otherwise).
As the ViewModel updates this MutableLiveData, the UI can reactively display or hide a loading indicator, ensuring that the user receives immediate feedback.By using LiveData, you ensure that the UI remains in sync with the ViewModel without the need for manual updates or complex event handling mechanisms.
It also improves testability, as the UI can be tested separately from the logic, relying on changes to the observable data to update the interface.

6. Clean Lifecycle and Resource Management:
By coupling the lifecycle of the ViewModel to the screen using LifecycleOwner, the architecture ensures that resources are efficiently managed.This is critical in applications where memory and performance are concerns, especially in mobile development. Without such lifecycle management, ViewModels might continue to exist in memory after the UI they serve has been destroyed, leading to potential memory leaks and degraded performance.In our example, when the user navigates away from the login screen, the ViewModel for that screen is destroyed along with any data or event listeners it holds.
This guarantees that memory is freed up, improving app performance and ensuring that there are no lingering references to stale data or UI elements.
7. Testability of Business Logic:
One of the key benefits of this architecture is how it improves the testability of the app.Since the ViewModel doesn’t directly depend on Flutter’s UI framework, it can be tested in isolation.
You can write unit tests for the business logic, ensuring that it behaves as expected, without worrying about UI-specific issues.
This makes the code more reliable and reduces the likelihood of bugs.For example, you can write tests to verify that the login() method in the LoginViewModel properly handles authentication and updates the loading state and emits response value.
Because the ViewModel only interacts with LiveData and not the UI itself, these tests are straightforward and don’t require any UI testing frameworks.
Implementing the Login Screen with ViewModel
Now that we’ve discussed the components of this architecture, let’s put them together to implement a login screen.Here’s a breakdown of the components:- LoginViewModel: This class extends BaseViewModel and handles the login logic. It exposes MutableLiveData properties for the loading state, and emits response value.
- LoginScreen: This is the UI layer. It uses LifecycleOwner to register and manage the lifecycle of the LoginViewModel. The screen listens to changes in the LiveData properties exposed by the ViewModel and updates the UI accordingly.
import 'package:flutter/material.dart';
import 'package:responsive_builder/responsive_builder.dart';
import 'package:flutterx_live_data/flutterx_live_data.dart';
import 'package:xflutter_cli/ui/widgets/instance/lifecycle_owner.dart';
import 'package:xflutter_cli/common/data/models/di/di_scope/di_scope.dart';
import './viewmodels/login_viewmodel.dart';
import 'mobile/login_mobile_screen.dart';
import 'tablet/login_tablet_screen.dart';
import 'package:get_it/get_it.dart';

class LoginScreen extends StatefulWidget {
  const LoginScreen({super.key});

  @override
  State<LoginScreen> createState() => _LoginScreenState();
}

class _LoginScreenState extends State<LoginScreen>
  with LifecycleOwner<LoginScreen, LoginViewModel>, ObserverMixin {

  @override
  void observeChanges(ObserverMixin observer) {
    // listen for login result
    viewModel.params.result.observe(observer, (LoginResponse response) {
      if (response.user != null) {
        // login success
        // navigate to home screen
      }
    });
  }

  @override
  DiScope get diScope => DiScope(
        name: 'login',
        factory: getIt.initLoginScope,
      );

  @override
  Widget build(BuildContext context) {
    return Stack(
      children: [
        // screen body
        Scaffold(
          body: SafeArea(
            child: ScreenTypeLayout.builder(
              // mobile screen
              mobile: (_) => const LoginMobileScreen(),

              // tablet screen
              tablet: (_) => const LoginTabletScreen(),
            ),
          ),
        ),

        // full-screen loader
        LiveDataBuilder<bool>(
          data: viewModel.baseParams.loading,
          builder: (BuildContext context, bool value) {
            if (value == true) {
              // display loader while request in progress
              return Scaffold(
                backgroundColor: Colors.black.withOpacity(0.05),
                body: const Center(child: CircularProgressIndicator.adaptive()),
              );
            }

            return const SizedBox();
          }
        ),
      ],
    );
  }
}